Friday, 11 March 2016

Send a PDF File as an attachment in Mail using java script in CRM 2015/2016

Today I will show how to "Send a PDF File as an attachment in Mail using java script in CRM 2015/2016 ".
To work around this we need to follow some steps :-

Step 1. Create a record in "Email" Entity with some subject value.
step 2. Create a record for activityParty in "ActivityParty" Entity.
step 3. Add the attachement of pdf in base64 to ActivityMimeAttachment and create a record in "ActivityMimeAttachment" Entity.
step 4. Open the Email form for based on the newelly created activityId.

STEP 1
CreateEmail: function () {
var email = new Object();
email.Subject = "Testing the sending of mail through java script";
SDK.REST.createRecord(email, "Email", EmailCallBack, function (error) { alert(error.message); });
},
STEP 2
When the Email record is created with sucessfull, Then we have to create activity party for that email.
// Email Call Back function
EmailCallBack: function (result) {
email1 = result;
var activityParty = new Object();
// Set the "party" of the ActivityParty // EntityReference of an entity this activityparty relatated to.
activityParty.PartyId = {
Id: Xrm.Page.context.getUserId(), // id of the the current user which becomes the sender
LogicalName: "systemuser"
};
// Set the "activity" of the ActivityParty
// EntityReference.
activityParty.ActivityId = {
Id: result.ActivityId,
LogicalName: "email"
};
// Set the participation type (what role the party has on the activity).
activityParty.ParticipationTypeMask = { Value: 1 }; // 1 mean Sender

SDK.REST.createRecord(activityParty, "ActivityParty", ActivityPartyCallBack, function (error) { alert(error.message); });
},
STEP 3
When activity Party is created we need to attached a pdf file as base64 to the mail.
For more information on how to create a pdf file follow my blog:-
Generate PDF File Using Java Script
ActivityPartyCallBack: function (result2) {
// Generate the pdf file to attached to the Email.
var responseSession = getReportingSession();
encodePdf(responseSession);
},
// create a Email record with the attachement and other parameters.
CreateEmailAttachment: function (bdy) {
//Email attachment parameters
var activitymimeattachment = Object();
activitymimeattachment.ObjectId = Object();
activitymimeattachment.ObjectId.LogicalName = "email";
activitymimeattachment.ObjectId.Id = email1.ActivityId;
activitymimeattachment.ObjectTypeCode = "email",
activitymimeattachment.Subject = "File Attachment";
activitymimeattachment.Body = bdy;
activitymimeattachment.FileName = "xyz.pdf";
//Attachment call
activitymimeattachment.MimeType = "application/pdf";

SDK.REST.createRecord(activitymimeattachment, "ActivityMimeAttachment",ActivityMimeAttachmentCallBack, function (error) { alert(error.message); });
},
STEP 4 ActivityMimeAttachmentCallBack: function (result) {
var options = {
openInNewWindow: true
};
Xrm.Utility.openEntityForm("email", email1.ActivityId, null, options);
},
//Encode the binary output pdf file to create an attachement
encodePdf: function (responseSession) {

var retrieveEntityReq = new XMLHttpRequest();

var pth = Xrm.Page.context.getClientUrl() + "/Reserved.ReportViewerWebControl.axd?ReportSession=" + responseSession[0] + "&Culture=1033&CultureOverrides=True&UICulture=1033&UICultureOverrides=True&ReportStack=1&ControlID=" + responseSession[1] + "&OpType=Export&FileName=Public&ContentDisposition=OnlyHtmlInline&Format=PDF";

retrieveEntityReq.open("GET", pth, true);
retrieveEntityReq.setRequestHeader("Accept", "*/*");
retrieveEntityReq.responseType = "arraybuffer";

retrieveEntityReq.onreadystatechange = function () {
if (retrieveEntityReq.readyState == 4 && retrieveEntityReq.status == 200) {
var binary = "";
var bytes = new Uint8Array(this.response);

for (var i = 0; i < bytes.byteLength; i++) {
binary += String.fromCharCode(bytes[i]);
}
var bdy = btoa(binary);

CreateEmailAttachment(bdy);
}
};
retrieveEntityReq.send();
},
 Method to get the session in the form of Array getReportingSession: function () {
var selectedIds = Xrm.Page.data.entity.getId();
var reportName = "abc.rdl";
var reportGuid = // Report GUID - Replace with your report GUID

var pth = Xrm.Page.context.getClientUrl() + "/CRMReports/rsviewer/QuirksReportViewer.aspx";

var retrieveEntityReq = new XMLHttpRequest();

retrieveEntityReq.open("POST", pth, false);

retrieveEntityReq.setRequestHeader("Accept", "*/*");

retrieveEntityReq.setRequestHeader("Content-Type", "application/x-www-form-urlencoded");

retrieveEntityReq.send("id=%7B" + reportGuid + "%7D&uniquename=" + Xrm.Page.context.getOrgUniqueName() + "&iscustomreport=true&reportnameonsrs=&reportName=" + reportName + "&isScheduledReport=false&p:<parameters Name In ssrs>=" + selectedIds.toLowerCase().replace(/[^a-z0-9-]/g, ''));
// p:<parameters Name In ssrs> :Is optional when you want to have parameter.
var x = retrieveEntityReq.responseText.lastIndexOf("ReportSession=");
var y = retrieveEntityReq.responseText.lastIndexOf("ControlID=");

var ret = new Array();

ret[0] = retrieveEntityReq.responseText.substr(x + 14, 24);
ret[1] = retrieveEntityReq.responseText.substr(x + 10, 32);

return ret;
},
 Hope this would help in your custom development.
Leave you comment if you have any query.....

Wednesday, 24 February 2016

Create A Custom DialogBox In CRM 2015/2016 Online

Hi All,

Today i am back with my new custom requirement in CRM 2015/2016 where i was required to
developer a custom Dialog Box, where we were required to get a different type of input from 
the user and that input need to used in the java script for the futher logic.

This is the sample Image of Custom Dialog Box which we develop using HTML.

To Full fill this requirement we need to follow some steps which are -:                                                                                                     
                                                     
Step 1 . First you need to develop the dialog using HTML webresource in CRM According to your         requirement what is needed. You can use CSS for the design and look.                         

Step 2. You should write all your java script logic in this web resource and pass the output result to
             the main CRM java script file.                                                                                            
            This is the sample code which we required to add in our dialog webresource to send a
            value as a return type to the main java script file.                                                               
 Mscrm.Utilities.setReturnValue(<yourReturnValue>);
       try{
        closeWindow(true);
        }
        catch(e){
        alert(e);
        }

Step 3. Now you need to call this dialog web Resource from the Main java script File.                                      Sample Code:                                                                                            
 var DialogProperty = new Xrm.DialogOptions();                                         
                        DialogProperty.width = 250;                                                                                  
                        DialogProperty.height = 350;                                                                                 

                        Xrm.Internal.openDialog("/WebResources/<dialogWebResourceName>", DialogProperty, null, null, callBackResponse);

 function callBackResponse(result) {                                                          
            if (result.length != 0)                                                           
                //Write Your Logic                                                             
                   }


Hope this is going to help you in your custom development.                                            
For Any queries regarding this post you can comment and i will be back ASAP with your query
                                        

Wednesday, 6 January 2016

Generate PDF File using java script in Microsoft Dynamics CRM 2015 online in just 1 click .

Hi All,
Today I Back with my New requirement to "Generate a PDF file of an open record in Just 1 Click "
The Image Below will give you the clear understanding what was real requirement was.

To solve this requirement we need to follow some steps :-

1. You need to create an SSRS Report for your Record by passing "RecordId" as parameter.
2. Get the ReportSession and ControlId for the called report.
3. Open the Report as a PDF Format.

After the SSRs Report has been Added in CRM Instance. You need to add a Button on Form Ribbon.

Once we done with SSRs Report and Button we will create a  java script file and code will be

Method to get the SessionID and ControlID for the SSRSReport getReportingSession: function () {
        var selectedIds = Xrm.Page.data.entity.getId();
        var reportName = "NameofReport.rdl";
        var reportGuid = getReportGuidByName("NameofReport");   //OR Report GUID - Replace with your report GUID

        var pth = Xrm.Page.context.getClientUrl() + "/CRMReports/rsviewer/QuirksReportViewer.aspx";

        var retrieveEntityReq = new XMLHttpRequest();

        retrieveEntityReq.open("POST", pth, false);

        retrieveEntityReq.setRequestHeader("Accept", "*/*");

        retrieveEntityReq.setRequestHeader("Content-Type", "application/x-www-form-urlencoded");

        retrieveEntityReq.send("id=%7B" + reportGuid + "%7D&uniquename=" + Xrm.Page.context.getOrgUniqueName() + "&iscustomreport=true&reportnameonsrs=&reportName=" + reportName + "&isScheduledReport=false&p:parameterNamespecified in ssrs report=" + selectedIds);

        var x = retrieveEntityReq.responseText.lastIndexOf("ReportSession=");
        var y = retrieveEntityReq.responseText.lastIndexOf("ControlID=");

        var ret = new Array();

        ret[0] = retrieveEntityReq.responseText.substr(x + 14, 24);
        ret[1] = retrieveEntityReq.responseText.substr(x + 10, 32);

        return ret;
    }
**Replace the Value which is specified with the Red Color in the code.

After we have received the Session Array we will call a method which will download the PDF file to our Local drive. Code is here.
Method to Download PDF. runReportToPrint: function () {       

        var params = getReportingSession();

        var newPth = Xrm.Page.context.getClientUrl() + "/Reserved.ReportViewerWebControl.axd?ReportSession=" + params[0] + "&Culture=1033&CultureOverrides=True&UICulture=1033&UICultureOverrides=True&ReportStack=1&ControlID=" + params[1] + "&OpType=Export&FileName=public&ContentDisposition=OnlyHtmlInline&Format=PDF";

        window.open(newPth, "_self");
    }
Hope this would help you in your custom development!!!
If you have any Query related the code!! Please leave the Comment!!!

Monday, 26 October 2015

Associate Records with the Record of Different Entity using java script


Hi All,

As a very common requirement, I was asked to implement the functionality to associate a record in CRM 2015 just to associate the existing record to the record of different entity.

To get this work done First you need to add SDK.REST.js library to your script.

Link to download Sdk.Rest

Then copy paste this code and pass the parameter value as required.

function associateRecord (parentId, childId) {

           SDK.REST.associateRecords(
                                          parentId,                                  //Guid of parent record
                                         "new_contactlist",                       // Schema Name of Parent Entity
                                          "new_contactlist_sevaprofilenew",  //Relationship Schema Name
                                          childId,                                    // Guid of Child Record
                                          "new_sevaprofilenew",             // Schema Name of Child entity
           
                       function () {
                                        alert("Association successful.");
                                        },
                       function () {
                                      alert("Record Already Found");
                                     });
        }

To get a lookup record of parent Entity in your script .

Please refer my previous Blog
http://crmpankaj.blogspot.in/2015/10/create-custom-dialog-lookup-values-for.html

Hope this would be very helpful to you in your development.

Create a custom Dialog Lookup Records For an Entities on button click.

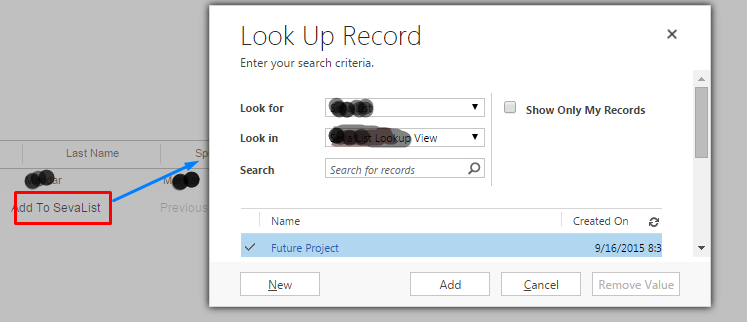
One feature of Dialogs is the ability to prompt the user for a record to interact with i.e. prompt for a lookup response.

This blog fulfil the Requirement Like we have a custom Button on the Form/Ribbon and onclick of this button i need to create a lookup for an Entity which looks similar to CRM Lookup.

Here is the code which i have used to get the solution.


var url = "/_controls/lookup/lookupsingle.aspx?objecttypes=" + objectTypeCode;
var DialogOptions = new Xrm.DialogOptions();
DialogOptions.width = 500;
 DialogOptions.height = 300;
Xrm.Internal.openDialog(Mscrm.CrmUri.create(url).toString(), DialogOptions, null, null, returnDialogResponse);

objectTypeCode:- You Need to provide a objectTypecode value of the Entity on which Entity the lookup is going to be created But I Recommend to get the "objectTypecode" dynamically by passing Schema Name of the Entity because when the solution is Export/Import then this Entity objectTypeCode may differ from different Machine.

Here i am providing a method which help you to get the objectTypeCode of an Entity by passing the Schema Name of an Entity.

 function getEntityObjectTypeCodeByName(entitySchemaName) {

            try {
                var lookupService = new window.parent.RemoteCommand("LookupService",                                           "RetrieveTypeCode");

                lookupService.SetParameter("entityName", entityName);

                var result = lookupService.Execute();

                if (result.Success && typeof result.ReturnValue == "number") {

                    return result.ReturnValue;

                } else {
                    return null;
                }
            } 
          catch (e) {
                alert("Error getting ETC by Name – " + e.description);
            }
        }

Hope this will be Helpful in your CRM custom development.


Wednesday, 15 July 2015

CRM 2015: JavaScript – Lookup Filtering using addCustomFilter


Here is my new post with the new java scripts in CRM for filtering lookup. In this post I am going to describe how to use addCustomView function to filter the lookup value.


Below I will show you how to filter a lookup based on the value of another field on the form. In this scenario we will be using the LookupField1 to filter the Parent Account lookup to only display Accounts with a matching LookupField1 value, and to display all Accounts when no LookupField1 value is specified.

To filter this we use the following code, and call the “getFilteredLookup” function on load and onChange of "LookupField1" of the form.

Click on the Image to Enlarge....


To create a fetchXml best way is to go and create an Advanced Find in CRM according to your condition and download the fetchXml.

After that you need to write an layoutXml for new lookup .For this i suggest copy the above code which i have written and change the row "id" and cell "name".

For viewId just provide any "id"({00000000-0000-0000-0000-000000000001}) as u like in above format and make sure it doesn't match with your default viewId.

Hope this would be helpfull to you.
Enjoy the great technology CRM.  Good Luck


Thursday, 9 July 2015

Not Able To Register Custom WorkFlow In Dynamic CRM 2013

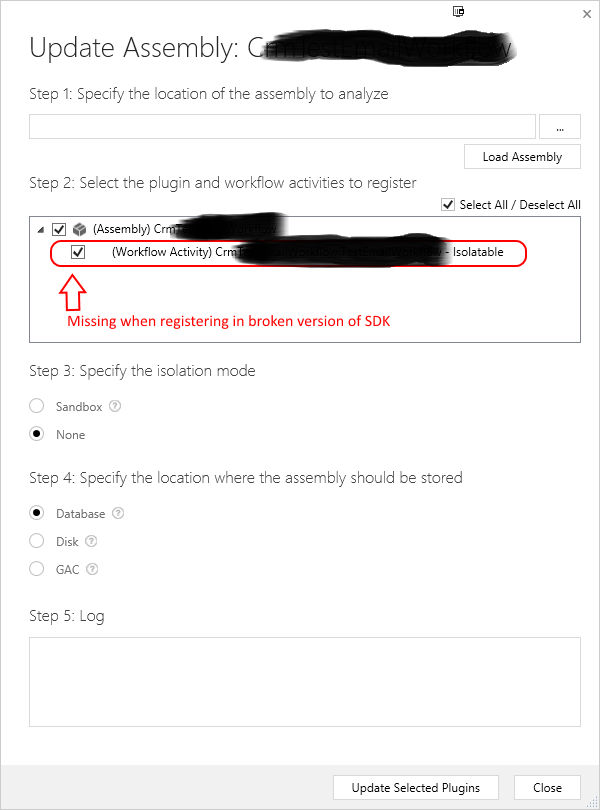
When i was trying to register my Custom Work Flow using CRM SDK 2013 version 6.1.1 .I used to get Error that  "No plugins have been selected from the list"

I have added a screen shot bottom which clearly make us understand that what we are missing.


If you are looking for this problem then Solution is that you need to download the older version 
of the SDK 2013 version 6.1.0 v2 and then register your workflow with the plugin registration
tool available in tools Folder.                                                                                                     

To get the older version of SDK. I found a link from community.dynamics.com shared by 
Guido Preite  in his blog .                                                                                                                         
                                                                                                                          
 Use this Link  :::::::                                                                                                                                      https://onedrive.live.com/redir? resid=E4B83260B94D4158!1387&authkey=!ALuzupR9uXK3iII&ithint=folder%2c.exe           

Hope this will be helpfull to you in your development work and will save your time.